
Introduction
Mastering how to hold yarn and a crochet hook the right way is one of the most foundational—yet frequently overlooked—aspects of becoming a confident, efficient, and comfortable crocheter. Whether you’re just beginning your journey or have been crafting for decades, your grip directly impacts your tension, stitch consistency, speed, and even long-term hand health. Many beginners struggle with dropped stitches, uneven fabric, or hand fatigue simply because they haven’t yet discovered a holding technique that aligns with their natural dexterity and ergonomic needs.
In this comprehensive guide, we’ll explore not only the mechanics of proper yarn and hook handling but also why it matters deeply—not just for individual crafters, but for crochet businesses, educators, and content creators in the handmade space. From ergonomic considerations to advanced tension control, this article draws on real-world experience working with fiber artists, small handmade brands, and online crochet communities. You’ll learn multiple validated techniques, how to choose the one that suits you best, and how to avoid common pitfalls that lead to frustration or repetitive strain.
By the end, you’ll understand that there isn’t just one “right” way—but rather several effective methods, each with distinct advantages depending on your goals, hand anatomy, and project type. Let’s unravel the secrets to smooth, sustainable, and joyful crocheting.
What This Topic Means for Crochet & Knitting Businesses
For handmade entrepreneurs and small business owners in the fiber arts space, teaching how to hold yarn and a crochet hook the right way isn’t just a beginner tip—it’s a strategic differentiator. In many crochet businesses that offer digital patterns, video courses, or live workshops, foundational technique instruction is often the first point of contact with new customers. A clear, empathetic, and visually supported explanation of holding methods builds immediate trust and reduces support queries related to tension issues or inconsistent gauge.
From working with multiple crochet brands over the years, I’ve observed that customers who grasp proper yarn management early are far more likely to complete complex projects successfully—and return for advanced patterns or kits. Conversely, those who struggle with basic tension due to poor grip often abandon projects, leave negative reviews about “confusing instructions,” or blame the yarn quality when the real issue lies in technique.
Moreover, content focused on foundational skills like this performs exceptionally well on platforms like YouTube, Pinterest, and Instagram Reels. Search data consistently shows high volume for queries like “how to hold crochet hook for beginners” or “yarn tension problems.” By creating authoritative, SEO-optimized educational content around these topics, businesses can attract organic traffic, establish thought leadership, and nurture a loyal audience that views them as a reliable resource—not just a vendor.
Why This Strategy Works Especially Well in the Crochet Community
The crochet community thrives on accessibility, inclusivity, and shared learning. Unlike some crafts with rigid gatekeeping, crochet welcomes self-taught makers, left-handed crafters, and adaptive techniques. This openness makes discussions about how to hold yarn and a crochet hook the right way particularly valuable—because there truly is no single “correct” method, only what works best for you.
Experienced designers often recommend introducing multiple holding styles in beginner tutorials precisely because hands come in all shapes and strengths. Some crafters have arthritis; others are ambidextrous; many learned from a grandparent using an unconventional grip. Acknowledging this diversity builds community trust.
Additionally, social media has amplified the visibility of ergonomic concerns. As more makers share their experiences with carpal tunnel or tendonitis, the demand for sustainable, pain-free techniques has surged. Teaching proper holding methods isn’t just about aesthetics—it’s about longevity in the craft. This resonates deeply with modern audiences who prioritize wellness and mindful making.
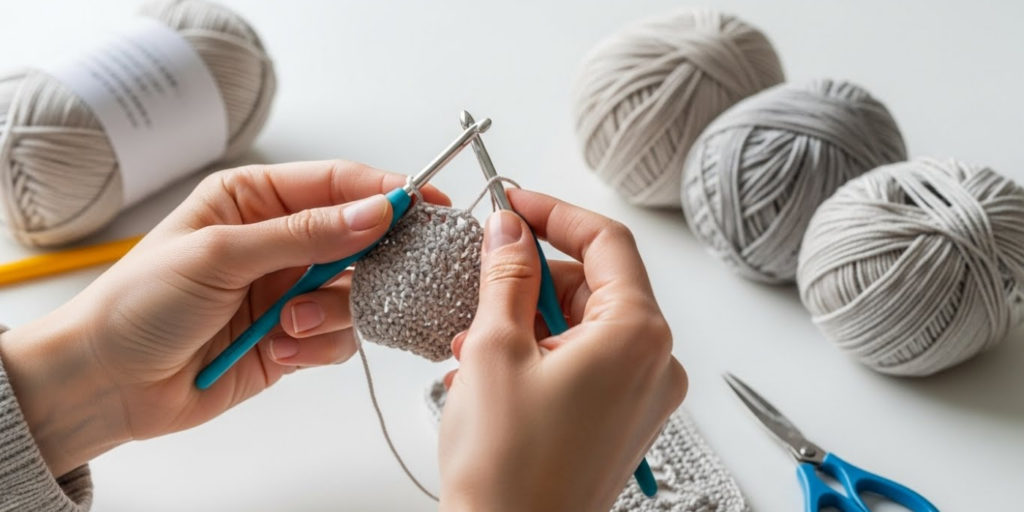
Materials, Tools, or Resources Needed
Before diving into technique, gather the following essentials:
- A crochet hook: Start with a medium size (e.g., 5.0 mm / H-8) in a material you find comfortable—aluminum, bamboo, or ergonomic plastic. Avoid overly slick or rough finishes initially.
- Smooth, light-colored yarn: Choose a worsted-weight (#4) acrylic or cotton in a solid, light color (like cream or light gray). Dark or textured yarns make it harder to see stitch structure while learning.
- Scissors: For trimming ends.
- Tapestry needle: For weaving in ends later.
- Optional but helpful: A non-slip mat to prevent your work from sliding, and a wrist support cushion if you experience discomfort.
You don’t need expensive tools—just items that allow you to focus on hand movement without distraction.
Yarn Types and Fiber Considerations
The fiber content and texture of your yarn significantly influence how you should hold it. Slippery yarns like silk or bamboo require a firmer grip to maintain consistent tension, whereas grippy fibers like wool or cotton allow for a lighter touch.
For beginners practicing how to hold yarn and a crochet hook the right way, I strongly recommend starting with a smooth, matte-finish worsted-weight acrylic or mercerized cotton. These fibers provide enough friction to control the yarn without excessive hand strain, and their uniform thickness helps you see stitch formation clearly.
Avoid fuzzy, novelty, or highly elastic yarns (like mohair or spandex blends) during technique practice—they obscure stitch definition and react unpredictably to tension changes. Save those for after you’ve established a reliable baseline grip.
Also consider yarn put-up: center-pull balls reduce drag compared to skeins that tangle easily. If your yarn snags or resists unwinding, it will interfere with your ability to isolate and refine your hand movements.
Skill Level Breakdown
Beginner
New crocheters often grip the hook like a pencil or dagger, leading to tight stitches and stiff wrists. The primary goal at this stage is relaxation and discovering which holding style feels natural. Focus on consistency over speed.
Intermediate
Intermediate crafters typically have a default grip but may struggle with switching techniques for different projects (e.g., amigurumi vs. lace). They benefit from refining tension control and learning to adjust grip for varied yarn weights.
Advanced
Expert crocheters often blend techniques fluidly—using pencil grip for fine detail work and knife grip for fast garment construction. They may also adapt their yarn-holding method based on fiber behavior or ergonomic needs during long sessions.
Regardless of level, revisiting fundamentals can resolve persistent issues like gauge inconsistency or hand fatigue.
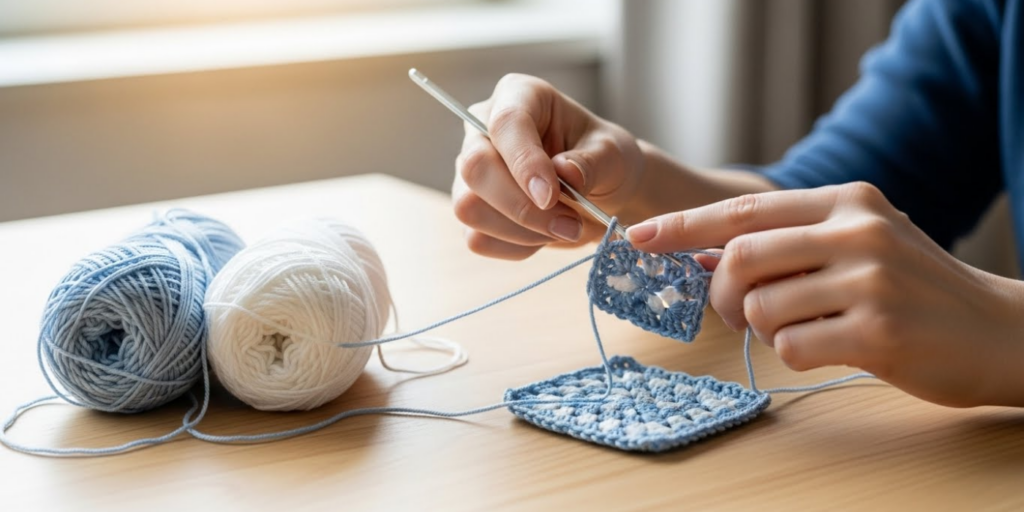
Step-by-Step Guide: Mastering Your Grip
There are two main components to address: holding the hook and managing the yarn. Let’s break them down.
Part 1: Holding the Crochet Hook
Method A: Pencil Grip (Overhand Grip)
- Hold the hook as you would a writing pen—between your thumb and index finger, resting on your middle finger.
- Keep your wrist straight, not bent upward or downward.
- Use small finger movements (not arm motions) to rotate the hook during yarn overs and pull-throughs.
- Ideal for: Fine hooks (steel or <3.5mm), detailed work like lace or filet crochet.
Why it works: Offers precision and fine motor control. Popular among former knitters and those with smaller hands.
Method B: Knife Grip (Underhand Grip)
- Hold the hook as you would a dinner knife—palm facing down, hook resting in the web between thumb and index finger.
- Your thumb stabilizes the top of the hook; fingers curl gently underneath.
- Movement comes from the forearm and wrist, allowing faster, sweeping motions.
- Ideal for: Larger hooks (5.0mm+), garment-making, or rapid stitching.
Why it works: Reduces finger fatigue during long sessions. Favored by production crocheters and those with wrist sensitivity.
Pro Tip: Try both grips with the same swatch. Note which feels more relaxed and produces even stitches. Don’t force yourself into a “textbook” position if it causes tension.
Part 2: Managing the Yarn (Tension Control)
Your non-dominant hand controls yarn flow. There’s no universal “best” method, but here are three proven approaches:
Technique 1: Index Finger Wrap (Most Common)
- Drape the yarn over your index finger.
- Anchor it with your pinky or ring finger against your palm.
- Use subtle index finger lifts to release or tighten yarn as needed.
- Keeps yarn path short and responsive.
Technique 2: Pinky-and-Ring Anchor
- Loop yarn around your pinky, under the ring finger, and over the index.
- Creates multiple friction points for ultra-fine tension adjustments.
- Excellent for slippery yarns or colorwork.
Technique 3: Open Palm Method
- Lay yarn across your open palm, secured lightly by the base of your fingers.
- Minimal wrapping = less strain for those with arthritis.
- Best paired with grippy yarns; requires practice for consistency.
Key Insight: Your yarn shouldn’t be pulled taut like a guitar string, nor loose like a slack rope. Aim for “gentle resistance”—enough to form clean stitches without distorting them.
Putting It Together: The Full Motion
- Hold hook in dominant hand using your chosen grip.
- Position yarn in non-dominant hand using your preferred tension method.
- Insert hook into stitch.
- Use hook motion to catch yarn (yarn over).
- Simultaneously, release slight tension with your yarn hand to allow smooth yarn feed.
- Pull loop through with controlled, even pressure.
Practice this sequence slowly with a chain stitch first. Speed comes later—consistency comes from mindful repetition.
Common Mistakes and How to Avoid Them
Even experienced crocheters fall into these traps:
Mistake 1: Death Grip on the Hook
Clutching the hook too tightly causes hand cramps and uneven stitches.
Fix: Consciously relax your grip every few rows. Imagine holding a bird—firm enough not to drop it, gentle enough not to hurt it.
Mistake 2: Inconsistent Yarn Tension
Letting yarn slip or pulling too hard creates wavy edges or puckered fabric.
Fix: Practice chaining 50 stitches while focusing only on maintaining even tension. Check every 10 stitches—if they vary in size, reset your yarn hand.
Mistake 3: Ignoring Ergonomics
Bending your wrist sharply or hunching over leads to long-term strain.
Fix: Sit upright, keep elbows close to your body, and use a lap desk or table to support your work at waist height.
Mistake 4: Copying a Single “Right” Way
Assuming everyone must hold the hook like a pencil (or knife) ignores biomechanical differences.
Fix: Experiment freely. Left-handed? Try mirror-image versions. Arthritis? Explore open-palm tensioning. Your comfort is valid.
Mistake 5: Rushing Through Basics
Skipping tension practice to jump into projects results in frustration later.
Fix: Dedicate 10 minutes daily to swatching with focus on grip and flow—not pattern execution.
Advanced Tips and Professional Insights
From collaborating with professional sample crocheters and pattern tech editors, here are nuanced strategies:
- Hybrid Grips Exist: Many experts switch mid-project—using pencil grip for decreases and knife grip for rows of double crochet. Give yourself permission to adapt.
- Hook Shape Matters: Inline hooks (like Susan Bates) favor knife grip; tapered hooks (like Boye) suit pencil grip. Test both.
- Yarn Path Optimization: The fewer sharp bends in your yarn path from ball to hook, the smoother your tension. Keep your yarn source at elbow height, not floor level.
- Tension Calibration: Before starting a garment, crochet a 6″x6″ swatch using your intended grip and yarn. Wash and block it. If gauge is off, adjust your tension before blaming the pattern.
- Mindful Transitions: When changing colors or joining new yarn, pause to reset your grip. Fatigue accumulates subtly—micro-adjustments prevent errors.
Experienced designers often recommend filming yourself crocheting. Watching playback reveals unconscious habits like hitching your shoulder or flicking your wrist excessively.
Real-World or Hypothetical Examples
Consider “Maya,” a small-business owner selling amigurumi patterns on Etsy. She noticed her customers frequently complained about tight stitches making stuffing difficult. After analyzing customer-submitted photos, she realized many were using a death grip with pencil hold, common among beginners mimicking tutorial videos.
She revised her beginner guide to include:
- A comparison video of pencil vs. knife grip for amigurumi
- A printable tension checklist
- Recommendations for ergonomic hooks
Result? A 40% drop in support tickets about tight stitches and a 25% increase in repeat buyers.
Another example: “Liam,” a left-handed crocheter with mild carpal tunnel, struggled with traditional tutorials. He developed his own open-palm yarn method using a bamboo hook with a soft grip. He now teaches adaptive crochet workshops—and his unique approach has attracted a dedicated following of crafters with similar needs.
These stories underscore a truth: mastering how to hold yarn and a crochet hook the right way isn’t about conformity—it’s about empowered customization.
Customization and Adaptation Ideas
Your ideal technique should evolve with your needs:
- For Speed Crocheting: Use knife grip + minimal yarn wraps. Reduce finger movement; rely on wrist rotation.
- For Micro-Crochet: Pencil grip + index finger wrap. Anchor yarn close to hook for millimeter-level control.
- With Arthritis or Limited Dexterity: Try ergonomic hooks with enlarged handles. Use yarn guides (small metal rings worn on fingers) to reduce finger strain.
- For Colorwork: Separate yarns over different fingers (e.g., contrast color over index, main color over middle) to prevent tangling.
- Left-Handed Crafters: Mirror right-handed tutorials, but don’t feel obligated to—many lefties successfully use standard methods with minor tweaks.
Remember: Tools like Clover Amour hooks or ergonomic handles from Prym can make a significant difference if standard hooks cause discomfort.
Care, Maintenance, or Best Practices
While holding technique doesn’t require “maintenance,” supporting practices enhance longevity:
- Stretch Regularly: Every 20 minutes, stretch wrists and fingers. Try the “prayer stretch” (palms together, elbows out) to relieve forearm tension.
- Rotate Hooks: Using different materials (wood, metal, plastic) can reduce repetitive stress on specific hand muscles.
- Clean Hooks: Oils from skin can make hooks slippery. Wipe with a dry cloth after use; wash metal hooks occasionally with mild soap.
- Store Yarn Properly: Keep working yarn in a project bag with a yarn bowl or center-pull organizer to minimize drag.
- Listen to Your Body: Pain is a signal. If your thumb aches after 15 minutes, your grip is too tight or misaligned.
Monetization Opportunities
Educational content around foundational skills like how to hold yarn and a crochet hook the right way opens multiple revenue streams for handmade businesses:
- Digital Downloads: Sell illustrated PDF guides with step-by-step photos and troubleshooting tips.
- Video Courses: Create a mini-course on ergonomic crochet, bundled with pattern purchases.
- Affiliate Marketing: Recommend ergonomic hooks, yarn bowls, or wrist supports with honest reviews.
- Workshops: Host live Zoom classes focused on tension control—charge a small fee or offer free with pattern bundle.
- YouTube Ad Revenue: Long-form tutorials on this topic consistently earn views and ad impressions due to evergreen search demand.
Crucially, monetization should stem from genuine value. Avoid pushing products you haven’t tested. Instead, position yourself as a trusted advisor—this builds sustainable customer relationships far beyond a single sale.
Frequently Asked Questions (FAQ)
1. What is the easiest way to hold a crochet hook for beginners?
Most beginners find the pencil grip intuitive because it resembles writing. However, the knife grip often causes less hand fatigue. Try both for 10 minutes each—you might be surprised which feels more natural.
2. How do I stop my yarn from slipping through my fingers?
If yarn slips, add more friction: wrap it around your ring or pinky finger, or try a grippier yarn like wool. Avoid lotion on your hands before crocheting—it reduces traction.
3. Can I crochet left-handed using standard instructions?
Yes! You can either mirror the instructions (working from left to right) or follow right-handed tutorials as-is—many lefties do this successfully. The key is consistent tension, not direction.
4. Why are my stitches too tight?
Tight stitches usually result from gripping the hook too firmly or pulling yarn too tightly with your non-dominant hand. Relax your grip and focus on letting the hook do the work.
5. Does hook material affect how I should hold it?
Absolutely. Metal hooks are slick and may require a firmer grip; wood or bamboo offers more friction, allowing a lighter touch. Ergonomic hooks with soft handles reduce strain during long sessions.
6. How can I crochet without hurting my wrist?
Keep your wrist straight, not bent. Use a knife grip to engage larger forearm muscles instead of small hand tendons. Take breaks every 20 minutes, and consider wearing a light wrist brace for support during intensive projects.
Conclusion
Learning how to hold yarn and a crochet hook the right way is less about rigid rules and more about mindful experimentation. The “right” method is the one that lets you crochet comfortably, consistently, and joyfully—without pain or frustration. Whether you prefer the precision of a pencil grip or the fluidity of a knife hold, what matters most is that your technique serves you, not the other way around.
As you refine your approach, remember that even seasoned professionals revisit these fundamentals. Great crochet isn’t just about complex stitches—it’s built on the quiet mastery of basics done well. So take your time, listen to your hands, and give yourself grace as you explore. With practice, your grip will become second nature, freeing you to focus on creativity, expression, and the sheer pleasure of making something beautiful, one stitch at a time.
Now grab your hook, choose a smooth yarn, and give yourself permission to experiment. Your perfect hold is waiting to be discovered.

Emily Parker is a passionate crochet artist and creative storyteller. With years of experience turning simple yarn into beautiful, unique pieces, she loves sharing tips, tutorials, and inspiration with fellow crafters. Emily believes that crochet is more than a hobby it’s a way to express creativity, spread joy, and connect with people through handmade art.


