
Introduction
If you’ve recently picked up a crochet hook or are considering diving into the world of handmade crafts, you’re in good company. Crochet has surged in popularity over the past decade—not just as a relaxing hobby but as a creative outlet with real entrepreneurial potential. At the heart of every beautiful blanket, cozy scarf, or intricate amigurumi lies a foundation of essential beginner crochet stitches. Mastering these core techniques isn’t just about following patterns; it’s about building confidence, developing muscle memory, and unlocking endless creative possibilities.
For new crafters, the sheer variety of stitches can feel overwhelming. But here’s the good news: you don’t need to learn them all at once. In fact, most professional designers and successful handmade brands rely on just a handful of foundational stitches to create stunning, marketable pieces. This guide cuts through the noise to focus exclusively on the beginner crochet stitches that matter most—those that form the backbone of 90% of modern crochet projects.
Whether you dream of selling your creations on Etsy, teaching workshops, or simply making gifts for loved ones, starting with the right stitches sets you up for long-term success. From working with multiple crochet brands to mentoring hundreds of students, I’ve seen firsthand how mastering these basics transforms beginners into confident makers. Let’s explore not only how to make each stitch but why it matters in today’s handmade economy.
What This Topic Means for Crochet & Knitting Businesses
Understanding beginner crochet stitches is more than a craft skill—it’s a strategic business asset. In many crochet businesses, especially those operating online, the ability to teach, demonstrate, and simplify foundational techniques directly impacts customer engagement and sales. When your audience feels empowered to start (and finish!) their first project, they’re far more likely to return for patterns, kits, or tutorials.
Experienced designers often recommend structuring product lines around these core stitches. For example, a yarn brand might launch a “Beginner Bundle” featuring worsted-weight yarn and a free pattern using only single and double crochet. A digital shop might offer a “Stitch Mastery” video course that breaks down each technique with close-up shots and troubleshooting tips. These approaches work because they meet new crafters exactly where they are: eager but intimidated.
From working with multiple crochet brands, I’ve observed that content centered on beginner stitches consistently outperforms advanced tutorials in terms of traffic, shares, and conversion. Why? Because the entry point is low, the perceived barrier to success is minimal, and the emotional payoff—“I made this!”—is immediate. For entrepreneurs, this translates into higher email list sign-ups, stronger social media followings, and repeat customers who grow alongside your brand.
Moreover, Google and Pinterest algorithms favor evergreen, high-intent content like “how to do basic crochet stitches.” By creating authoritative, well-structured guides (like this one), businesses position themselves as trusted resources—boosting SEO, attracting organic traffic, and building long-term authority in the handmade niche.
Why This Strategy Works Especially Well in the Crochet Community
The crochet community thrives on accessibility and generosity. Unlike some crafts that require expensive tools or years of training, crochet begins with just two items: yarn and a hook. This low barrier to entry fosters inclusivity—and creates a constant influx of new learners searching for clear, reliable instruction.
New crafters aren’t just looking for definitions; they want to do. They crave step-by-step guidance that anticipates their struggles (like inconsistent tension or miscounted stitches) and offers practical fixes. Content that delivers this builds instant trust. In fact, many top-performing crochet blogs and YouTube channels attribute their growth to “back-to-basics” series focused on beginner crochet stitches.
Additionally, the tactile nature of crochet makes visual and kinesthetic learning essential. A well-crafted article with detailed photos, stitch diagrams, and common mistake alerts becomes a go-to reference—not just for reading, but for pausing, practicing, and returning to again and again. This behavior signals to search engines that your content is valuable, increasing dwell time and reducing bounce rates.
Finally, the emotional journey of a beginner crafter is powerful. The first time they successfully complete a row of double crochet or fix a dropped stitch without unraveling everything, they experience genuine pride. Brands and creators who honor that journey—by celebrating small wins and demystifying jargon—earn loyalty that transcends transactions.
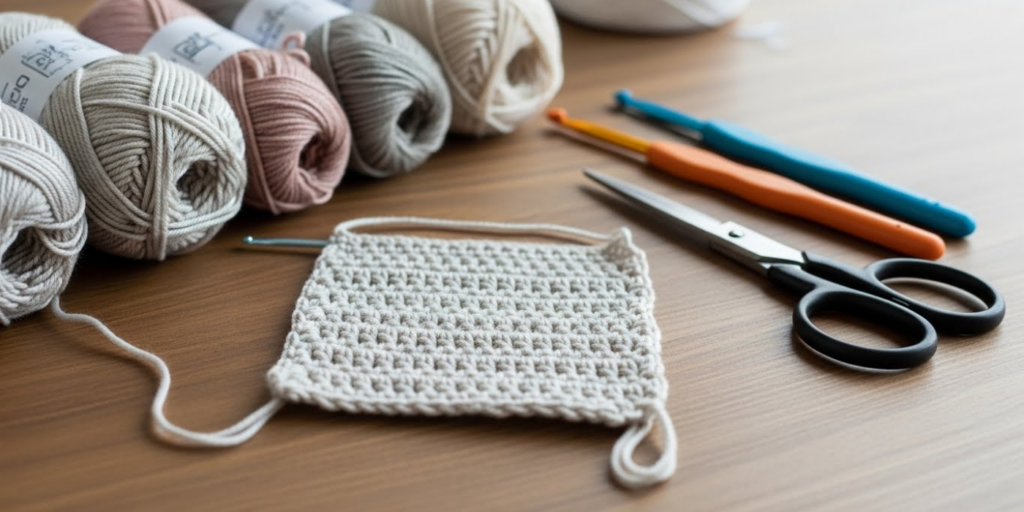
Materials, Tools, or Resources Needed
Before diving into stitches, ensure you have the right foundation. You don’t need a full arsenal—just a few quality essentials:
- Crochet Hook: Start with a size H/8 (5.0 mm) aluminum hook. It’s comfortable to hold, works well with medium-weight yarn, and clearly shows stitch definition.
- Yarn: Choose a smooth, light-colored worsted-weight (Category 4) acrylic or cotton blend. Avoid dark colors (hard to see stitches), fuzzy textures (obscures structure), or super-skinny yarns (frustrating for beginners).
- Scissors: A small, sharp pair for clean cuts.
- Tapestry Needle: For weaving in ends neatly.
- Stitch Markers: Simple plastic rings or safety pins to mark the beginning of rounds or important points.
- Measuring Tape: To check gauge if following a pattern later.
- Notebook or Digital App: To track progress, note mistakes, and record modifications.
Optional but helpful:
- Row counter (physical or app-based)
- Ergonomic hook with soft grip (reduces hand fatigue)
- Project bag to keep supplies organized
Investing in decent tools from the start prevents unnecessary frustration. A bent or poorly finished hook can snag yarn; cheap yarn may split easily. These small irritants disproportionately affect beginners, who haven’t yet developed the resilience to push through technical hiccups.
Yarn Types and Fiber Considerations
Not all yarns are created equal—especially for learning beginner crochet stitches. Your choice directly impacts how easily you’ll see your work, maintain even tension, and recover from errors.
Best Fibers for Beginners:
- Acrylic: Affordable, durable, widely available, and forgiving. Holds stitch shape well and comes in countless colors. Ideal for practice swatches and first projects.
- Cotton: Smooth, non-stretchy, and crisp—perfect for dishcloths, coasters, or summer garments. Shows stitch definition beautifully but can be less elastic, requiring slightly looser tension.
- Wool Blends: Warm and resilient, but pure wool may felt if washed incorrectly. A wool-acrylic blend offers bounce without high maintenance.
Fibers to Avoid Initially:
- Mohair, Chenille, or Bouclé: These novelty yarns obscure stitch structure, making it hard to identify where to insert your hook.
- Very Thin Yarns (Lace or Fingering Weight): Require tiny hooks and intense focus—save these for later.
- Dark or Variegated Yarns: While beautiful, they hide stitch details. Stick to solid, light neutrals (cream, beige, light gray) until you’re confident.
Also consider yarn put-up. Center-pull balls reduce tangles, while skeins may need winding into balls before use. Many big-box craft stores sell pre-wound “cakes” specifically designed for hassle-free crocheting.
Skill Level Breakdown
Understanding where you stand helps set realistic expectations and choose appropriate next steps.
Beginner (0–3 months experience):
- Can hold a hook and yarn comfortably
- Understands basic terms: chain, slip knot, turning chain
- Can complete simple rows or rounds without constant reference
- Projects: Dishcloths, scarves, basic beanies
Intermediate (3–12 months):
- Reads written patterns and understands abbreviations
- Combines multiple beginner crochet stitches intentionally
- Fixes minor mistakes without frogging entire projects
- Projects: Sweaters, blankets with colorwork, stuffed toys
Advanced (1+ years):
- Creates original designs or modifies existing ones
- Works confidently with charts, lace, or complex textures
- Teaches others or sells finished goods professionally
This guide targets true beginners but includes insights valuable even to intermediates refining fundamentals. Remember: even expert crocheters revisit basic stitches—they’re the alphabet of the craft.
Step-by-Step Guide to Essential Beginner Crochet Stitches
Master these six stitches, and you’ll be equipped to tackle most beginner-friendly patterns. Practice each on a 6″ x 6″ swatch before combining them.
1. Slip Knot (The Starting Point)
Every project begins here.
How to:
- Make a loop with the yarn tail over the working end.
- Insert hook through loop, catch working end, and pull gently to tighten around hook.
- Adjust so it’s snug but slides freely.
Pro Tip: Leave a 6-inch tail for weaving in later.
2. Chain Stitch (ch)
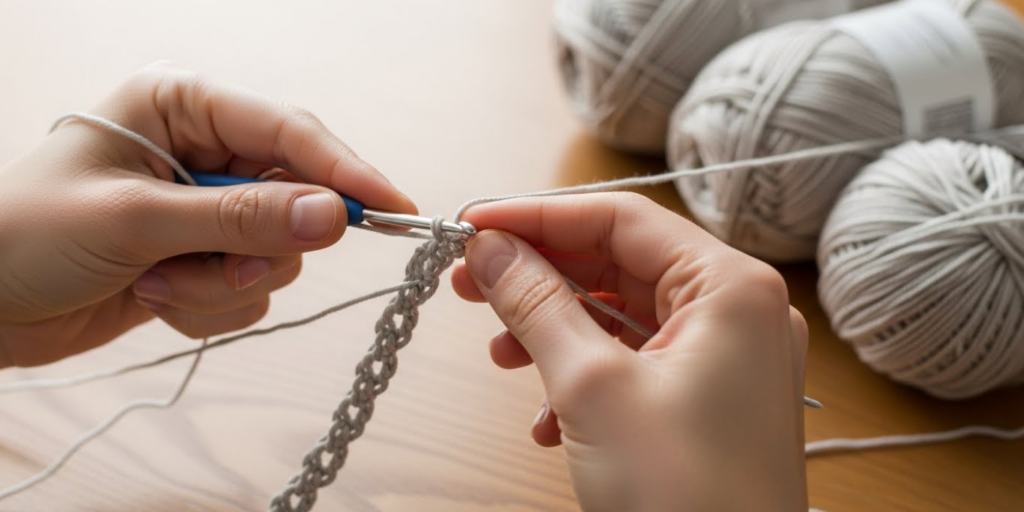
The foundation for almost all crochet.
How to:
- Yarn over (yo)—wrap yarn over hook from back to front.
- Pull through loop on hook.
- Repeat for desired number of chains.
Key Insight: Keep tension relaxed. Tight chains make the next row difficult.
3. Single Crochet (sc)
Dense, sturdy, and perfect for amigurumi or dishcloths.
How to:
- Insert hook into second chain from hook (or specified stitch).
- Yo, pull up a loop (2 loops on hook).
- Yo, pull through both loops.
Practice Drill: Make a row of 10 sc into a foundation chain. Count stitches—each should look like a “V.”
4. Half Double Crochet (hdc)
A happy medium between sc and dc—slightly taller with subtle texture.
How to:
- Yo first, then insert hook into stitch.
- Yo, pull up a loop (3 loops on hook).
- Yo, pull through all 3 loops at once.
Why It Matters: hdc creates flexible fabric ideal for beanies and baby blankets.
5. Double Crochet (dc)
The workhorse of afghans and shawls—quick to work and airy.
How to:
- Yo, insert hook into stitch.
- Yo, pull up a loop (3 loops on hook).
- Yo, pull through first 2 loops (2 loops remain).
- Yo, pull through last 2 loops.
Common Error: Skipping the initial yo. Always yo before inserting hook.
6. Slip Stitch (sl st)
Used for joining rounds, adding borders, or moving invisibly across fabric.
How to:
- Insert hook into stitch.
- Yo, pull through both stitch and loop on hook in one motion.
Professional Note: Keep sl st loose—tight ones pucker fabric.
Putting It Together:
Create a sampler swatch:
Row 1: Ch 15
Row 2: Sc in 2nd ch from hook, sc across (14 sc)
Row 3: Ch 2 (counts as first hdc), hdc across
Row 4: Ch 3 (counts as first dc), dc across
Row 5: Sl st across (for practice—this row will be short!)
Block your swatch lightly to see true stitch dimensions.
Common Mistakes and How to Avoid Them
Even seasoned crocheters occasionally fall into these traps—but awareness prevents frustration.
1. Inconsistent Tension
Symptom: Fabric ripples or puckers; edges flare or curl.
Fix: Practice holding yarn the same way each session. Wrap yarn around pinky and over index finger for control. Don’t pull too tight on the working yarn.
2. Adding or Losing Stitches
Symptom: Work gets wider/narrower unintentionally.
Fix: Count stitches every row until it’s automatic. Use stitch markers at the first and last stitch of each row.
3. Misidentifying the First Stitch
Symptom: Gaps or bumps at row starts.
Fix: Know whether your pattern counts the turning chain as a stitch. When in doubt, skip the first stitch after the turning chain unless instructed otherwise.
4. Twisted Foundation Chains
Symptom: Circular projects spiral instead of lying flat.
Fix: Before joining in the round, ensure your chain isn’t twisted. Lay it flat on a table and check.
5. Ignoring Gauge
Symptom: Finished item is too big/small despite correct stitch count.
Fix: Always make a gauge swatch for wearable items. Adjust hook size up or down until your stitches match the pattern’s specified size.
6. Not Weaving in Ends Securely
Symptom: Yarn tails pop out after washing.
Fix: Weave in ends for at least 2 inches, changing direction once to lock them.
Remember: Mistakes are part of learning. Frogging (ripping out) work isn’t failure—it’s refinement.
Advanced Tips and Professional Insights
Once you’ve mastered the basics, these nuances elevate your work from “homemade” to “handcrafted.”
Tension Control Through Hook Material:
Aluminum hooks glide quickly—great for speed but harder to control for beginners. Bamboo or wooden hooks offer more grip, slowing your pace and improving consistency. Try both.
Reading Your Fabric:
Experienced crocheters rarely count stitches—they “read” the Vs of completed rows. Train yourself by tracing each V with your finger before inserting the hook.
Turning Chains Aren’t Always Stitches:
In single crochet, the turning chain (ch 1) usually doesn’t count as a stitch. In double crochet, ch 3 often does. Always check pattern notes.
The Magic Ring for Amigurumi:
Instead of chaining and joining (which leaves a hole), use a magic ring to start circular projects. It cinches tightly for seamless centers.
Blocking Transforms Texture:
Wet-blocking cotton or steam-blocking acrylic opens up stitch definition dramatically. Pin your swatch to measurements and let dry completely.
From working with multiple crochet brands, I’ve learned that professionals prioritize stitch consistency over speed. A slow, even piece always looks more polished than a rushed, uneven one.
Real-World or Hypothetical Examples
Consider Maya, a stay-at-home mom who started crocheting during lockdown. She began with dishcloths using only single crochet—simple, functional, and quick to finish. After mastering tension, she moved to half double crochet baby blankets, which sold out at her local craft fair. Within a year, she launched an Etsy shop specializing in customizable nursery sets, all built from combinations of the beginner crochet stitches covered here.
Or take Liam, a college student who used leftover yarn to make phone cozies with double crochet. He posted time-lapse videos on TikTok showing the process, emphasizing how just one stitch could create a trendy accessory. His account grew to 50K followers, leading to sponsored content from yarn companies.
These aren’t outliers. In many crochet businesses, the path to profitability starts with humble, stitch-focused projects that build skills and audience trust simultaneously.
Customization and Adaptation Ideas
Once comfortable, personalize your work without complicating technique:
- Color Play: Alternate yarn colors every few rows for stripes. Carry unused yarn up the side to avoid excessive ends.
- Texture Mixing: Combine single and double crochet in the same row (e.g., sc, dc, sc, dc) for ribbed effects.
- Edging Variations: Finish any project with a round of slip stitches for a clean border, or shell stitches (5 dc in one stitch) for flair.
- Size Scaling: Use the same stitch pattern with bulky yarn and a large hook for a chunky throw, or fingering weight for a delicate shawl.
- Functional Tweaks: Add buttonholes by chaining 2 and skipping 2 stitches in a single crochet band.
The beauty of beginner crochet stitches is their versatility. A single pattern can yield dozens of unique items based on yarn choice, color, and finishing.
Care, Maintenance, or Best Practices
Extend the life of your handmade items with proper care:
- Washing: Hand-wash in cool water with mild detergent. Avoid wringing—roll in a towel to remove excess water.
- Drying: Lay flat on a mesh rack away from direct sun. Reshape while damp.
- Storage: Fold, don’t hang, sweaters to prevent stretching. Store in breathable cotton bags with cedar blocks to deter moths.
- Hook Care: Wipe metal hooks with a dry cloth after use. Wooden hooks benefit from occasional oiling (mineral oil works well).
For your own practice: Clean hooks regularly to prevent yarn buildup, which affects glide. Replace hooks if bends or rough spots develop.
Monetization Opportunities
Mastering beginner crochet stitches opens multiple income streams—ethically and sustainably:
- Pattern Design: Create simple, well-photographed PDFs for platforms like Etsy or Ravelry. Focus on clear instructions and stitch charts.
- Kits: Pair your patterns with curated yarn and hooks. Include a printed stitch guide as added value.
- Workshops: Teach in-person or via Zoom. Beginners pay for guided support and immediate feedback.
- Content Creation: Build a blog or YouTube channel around foundational techniques. Monetize through ads (AdSense), affiliates (yarn links), or Patreon.
- Custom Commissions: Offer personalized baby blankets or pet sweaters using basic stitches—low complexity, high demand.
Crucially, never promise unrealistic earnings. Instead, emphasize skill-building, community, and creative fulfillment. Authenticity attracts loyal followers who support your journey.
Frequently Asked Questions (FAQ)
1. What is the easiest crochet stitch for absolute beginners?
The single crochet (sc) is widely considered the easiest. It’s short, dense, and forgiving of tension inconsistencies, making it ideal for first projects like dishcloths or simple squares.
2. How long does it take to learn basic crochet stitches?
Most new crafters grasp the fundamentals within 2–4 hours of focused practice. Consistency matters more than duration—15 minutes daily beats one marathon session weekly.
3. Do I need different hooks for different beginner stitches?
No. A single medium-sized hook (H/8 or 5.0 mm) works perfectly for practicing all core beginner crochet stitches with worsted-weight yarn. Specialty hooks come later.
4. Why does my crochet fabric curl at the edges?
Curling usually results from too-tight tension or incorrect stitch count. Ensure your foundation chain is loose, and always count stitches per row. Blocking can also help flatten edges.
5. Can I mix beginner stitches in one project?
Absolutely! Combining stitches (e.g., single and double crochet) creates texture and visual interest. Many popular patterns, like ripple blankets, rely on such combinations.
6. What’s the difference between US and UK crochet terms?
US single crochet = UK double crochet; US double crochet = UK treble crochet. Always check a pattern’s terminology note—most free patterns specify “US terms.”
Conclusion
Learning beginner crochet stitches is more than a technical exercise—it’s your first step into a vibrant, supportive, and creatively limitless community. With just six foundational techniques, you hold the keys to crafting everything from practical household items to heartfelt gifts and even profitable small businesses.
Don’t rush. Spend time with each stitch until it feels natural. Celebrate the wobbly first swatch, the fixed mistake, the finished project—no matter how simple. These moments build the confidence that fuels lifelong creativity.
As you grow, remember that even the most intricate lace or elaborate garment began with a slip knot and a chain. Your journey starts now, one stitch at a time. Pick up your hook, choose a soft skein of yarn, and begin. The handmade world is waiting for what only you can create.

Emily Parker is a passionate crochet artist and creative storyteller. With years of experience turning simple yarn into beautiful, unique pieces, she loves sharing tips, tutorials, and inspiration with fellow crafters. Emily believes that crochet is more than a hobby it’s a way to express creativity, spread joy, and connect with people through handmade art.


