
Introduction
Crochet is more than just a craft—it’s a gateway to creativity, mindfulness, and even entrepreneurship. For beginners stepping into this world of loops, hooks, and yarn, the journey can feel both exciting and overwhelming. That’s why a solid beginner’s guide to crochet isn’t just helpful—it’s essential. Whether you’re looking to unwind after a long day, create handmade gifts, or eventually launch your own fiber-based business, mastering the fundamentals sets the stage for everything that follows. In this comprehensive guide, we’ll walk you through every critical element: from choosing the right tools and understanding yarn fibers to executing foundational stitches and completing your very first project. You’ll also discover how these early skills translate into real-world opportunities within the booming handmade economy. With clear instructions, professional insights, and actionable tips drawn from years of hands-on experience in both crafting and teaching, this guide is designed to be your trusted companion as you take your first stitches into the vibrant world of crochet.
What This Topic Means for Crochet & Knitting Businesses
From working with multiple crochet brands and mentoring emerging makers, I’ve observed a consistent truth: the success of any handmade business—whether selling patterns, finished goods, or online courses—rests on the foundation of beginner-friendly education. A well-crafted beginner’s guide to crochet doesn’t just serve hobbyists; it fuels entire ecosystems of artisans, educators, and small retailers.
Many crochet businesses thrive by meeting newcomers exactly where they are. Consider platforms like Etsy or Ravelry: new crocheters often start by searching for “easy crochet projects” or “how to hold a hook,” and content that answers those questions becomes a powerful entry point. In fact, experienced designers often recommend building your brand around educational content first—because trust is earned when you solve real problems before asking for a sale.
Moreover, beginner-focused materials open doors to digital product creation. Printable PDF guides, video tutorials, and curated starter kits (featuring recommended hooks and yarn) have become staple offerings for successful handmade entrepreneurs. These products not only generate passive income but also establish authority in a crowded marketplace.
In many crochet businesses, customer retention begins with onboarding. When a new maker feels confident after their first scarf or dishcloth, they’re far more likely to return for advanced patterns, join a membership community, or invest in premium workshops. Thus, investing time in creating a thorough, empathetic beginner’s guide to crochet isn’t just altruistic—it’s a strategic business move that nurtures long-term relationships and sustainable growth.
Why This Strategy Works Especially Well in the Crochet Community
The crochet community stands out for its warmth, inclusivity, and eagerness to share knowledge. Unlike some creative fields that gatekeep expertise, crochet thrives on mentorship. This cultural trait makes beginner-focused content uniquely effective.
Experienced designers often recommend starting with simple, satisfying projects because early wins build confidence—and confidence keeps people stitching. The tactile nature of crochet, combined with its relatively low barrier to entry (you only need one hook, not two needles like knitting), makes it especially accessible. From working with multiple crochet brands, I’ve seen firsthand how a well-explained chain stitch or single crochet can transform someone from “I can’t do this” to “I made this myself!” in under an hour.
Additionally, social media has amplified the power of beginner content. Platforms like Instagram Reels, TikTok, and YouTube Shorts favor short, visual tutorials—perfect for demonstrating basic stitches. A 30-second clip showing how to hold yarn tension can go viral, driving traffic to blogs, shops, or Patreon pages. This organic reach is invaluable for small businesses.
Furthermore, the handmade movement aligns with broader consumer trends: sustainability, slow living, and personalized gifting. New crocheters aren’t just learning a skill—they’re joining a values-driven community. By offering a compassionate, detailed beginner’s guide to crochet, you position yourself not just as a seller, but as a guide in that meaningful journey.
Materials, Tools, or Resources Needed
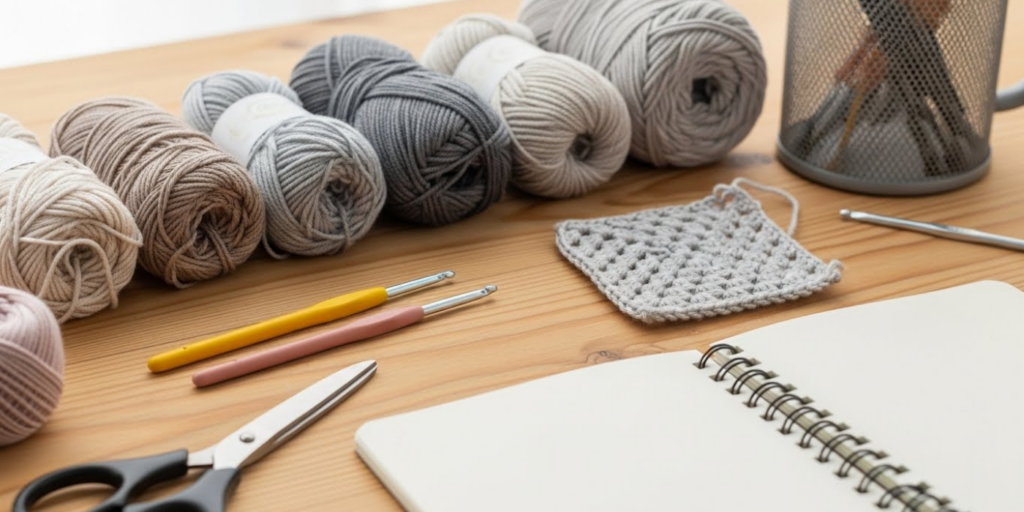
Before you make your first loop, gathering the right tools ensures a smoother, more enjoyable experience. While crochet requires fewer supplies than many crafts, quality matters—especially for beginners who are still developing motor memory and tension control.
Essential Tools for Every Beginner
- Crochet Hook: Start with a medium-sized aluminum hook, such as size H/8 (5.0 mm). Aluminum provides smooth glide without being slippery, and the 5.0 mm size works well with worsted-weight yarn—the most beginner-friendly option.
- Yarn: Choose a light-colored, smooth, worsted-weight (Category 4) acrylic or cotton yarn. Dark or fuzzy yarn hides stitches, making it hard to see your work. Light colors like cream, light gray, or pastel blue offer excellent stitch definition.
- Scissors: A small, sharp pair dedicated to yarn cutting prevents frayed ends.
- Tapestry Needle: Also called a yarn needle, this blunt-tipped tool weaves in loose ends neatly.
- Stitch Markers: Simple plastic rings or locking markers help track rounds or pattern repeats.
- Measuring Tape: Essential for checking gauge and sizing projects.
Optional but Helpful Add-Ons
- Row Counter: A mechanical or digital counter clips onto your hook to track rows—useful for repetitive patterns.
- Hook Organizer: Keeps your growing collection tangle-free.
- Project Bag: A soft pouch with compartments protects your work-in-progress and tools.
From working with multiple crochet brands, I’ve learned that beginners often underestimate the impact of tool ergonomics. If you have arthritis or hand fatigue, consider ergonomic hooks with cushioned handles (like those from Clover or Tulip). They reduce strain during longer sessions and encourage consistent practice.
Remember: you don’t need everything at once. Start with a hook, one skein of yarn, scissors, and a tapestry needle. As your skills grow, so will your toolkit.
Yarn Types and Fiber Considerations
Choosing the right yarn is as crucial as selecting your hook. The fiber content affects drape, durability, care, and even how easily you can see your stitches—key factors for beginners.
Common Yarn Fibers Explained
- Acrylic: Affordable, widely available, machine-washable, and colorfast. It’s forgiving for beginners because it doesn’t split easily and holds its shape well. Ideal for practice swatches, blankets, and amigurumi.
- Cotton: Breathable, sturdy, and great for household items like dishcloths and market bags. However, it lacks elasticity, which can make tension harder to manage initially. Look for mercerized cotton (like Lion Brand 24/7 Cotton) for smoother handling.
- Wool: Elastic and warm, wool is excellent for garments. But it can felt in the wash and may irritate sensitive skin. Superwash wool (treated to be machine-washable) is a safer beginner option.
- Bamboo/Viscose: Silky and drapey, perfect for shawls—but slippery and prone to splitting. Not recommended for first projects.
- Blends: Many yarns combine fibers (e.g., acrylic-cotton or wool-nylon) to balance pros and cons. A 50/50 cotton-acrylic blend offers structure with softness.
Yarn Weight Matters
Yarn is categorized by weight—from lace (0) to jumbo (7). For your beginner’s guide to crochet, stick to worsted weight (4). It’s thick enough to see stitches clearly but not so bulky that projects become heavy quickly. Sport (2) or DK (3) weights are also manageable once you’ve mastered basics.
Always check the yarn label. It includes:
- Recommended hook size
- Gauge (stitches per inch)
- Care instructions
- Dye lot number (buy extra from the same lot to avoid color shifts)
Experienced designers often recommend buying at least two skeins of the same yarn for your first project—even if the pattern calls for one. Mistakes happen, and running out mid-project is frustrating.
Pro tip: Avoid novelty yarns (eyelash, bouclé, or metallic) until you’re comfortable with standard textures. Their irregular surfaces obscure stitch structure, making error correction difficult.
Skill Level Breakdown (Beginner / Intermediate / Advanced)
Understanding where you fall on the crochet spectrum helps set realistic expectations and choose appropriate projects.
Beginner (0–3 months)
- Skills: Holding hook and yarn, making slip knots, chaining, single crochet (sc), half double crochet (hdc), turning work, fastening off.
- Projects: Dishcloths, simple scarves, granny squares, basic beanies (worked flat).
- Mindset: Focus on consistency over speed. Tension will even out with practice.
Intermediate (3–12 months)
- Skills: Reading written patterns and charts, increasing/decreasing, working in the round, changing colors, basic shaping (for garments), recognizing and fixing mistakes.
- Projects: Sweaters, amigurumi, lace shawls, textured blankets (like basketweave or puff stitch).
- Mindset: Experimentation begins. You understand why a stitch works, not just how.
Advanced (1+ years)
- Skills: Designing original patterns, complex colorwork (tapestry, intarsia), garment construction with proper fit, advanced stitches (popcorn, bobble, cable), blocking techniques.
- Projects: Custom-fit cardigans, intricate doilies, wearable art, published patterns.
- Mindset: Mastery meets innovation. You troubleshoot intuitively and adapt patterns freely.
For your beginner’s guide to crochet, stay firmly in the beginner zone. Resist the urge to jump ahead—solid fundamentals prevent bad habits that are hard to unlearn later. In many crochet businesses, instructors emphasize that 80% of advanced errors stem from shaky basics.
Step-by-Step Guide
Now, let’s get practical. Follow this detailed walkthrough to complete your first project: a simple dishcloth using only single crochet stitches. This builds muscle memory, teaches edge neatness, and results in a useful item.
Step 1: Make a Slip Knot
- Pull out about 6 inches of yarn tail.
- Create a loop by crossing the working yarn (attached to the skein) over the tail.
- Insert your fingers through the loop, grab the working yarn, and pull a new loop through.
- Place this loop on your hook and gently tighten by pulling the tail. The knot should slide smoothly along the hook shaft.
💡 Tip: Don’t pull too tight—it should move freely but not slip off.
Step 2: Chain Stitch (ch)
- Hold the hook in your dominant hand like a pencil or knife (whichever feels natural).
- Wrap yarn over the hook from back to front (this is called a “yarn over” or yo).
- Rotate the hook slightly and pull the yarn through the slip knot loop.
- You’ve made one chain! Repeat until you have 25 chains (or any odd number for a square).
⚠️ Common issue: Chains too tight. Keep your grip relaxed—tension comes from your yarn hand, not your hook hand.
Step 3: Single Crochet (sc) Row 1
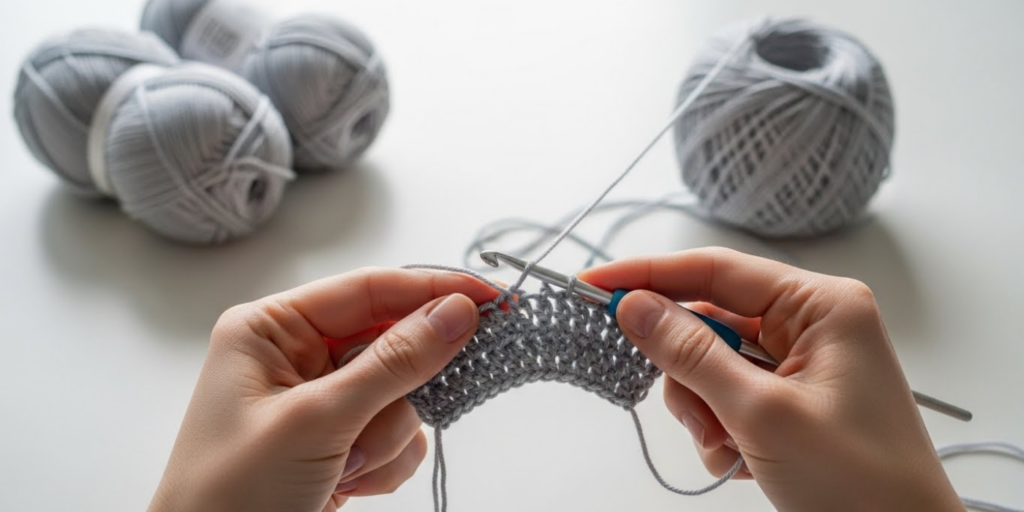
- Skip the first chain (this acts as your turning chain).
- Insert hook into the second chain from the hook.
- Yarn over and pull up a loop (you now have 2 loops on hook).
- Yarn over again and pull through both loops.
- You’ve made one sc! Repeat across the row—24 sc total.
Step 4: Turn Your Work
- At the end of the row, chain 1 (this is your turning chain for sc).
- Rotate your work clockwise so the wrong side faces you.
- Keep the working yarn at the back.
Step 5: Continue in Single Crochet
- Insert hook into the first stitch (not the turning chain).
- Complete sc as before.
- Work one sc in each stitch across.
- Chain 1, turn. Repeat this row until your piece measures roughly 8×8 inches (about 30–35 rows).
Step 6: Fasten Off
- After your last stitch, cut yarn leaving a 6-inch tail.
- Yarn over and pull the tail completely through the loop on your hook.
- Tighten to secure.
Step 7: Weave in Ends
- Thread the tail onto a tapestry needle.
- Run it through several stitches on the wrong side.
- Trim excess close to the fabric.
Congratulations—you’ve completed your first project! This dishcloth teaches rhythm, tension control, and edge alignment. Practice it 2–3 times before moving to more complex stitches.
Common Mistakes and How to Avoid Them
Even seasoned crocheters started with wobbly edges and dropped stitches. Recognizing frequent beginner errors helps you correct them early.
1. Uneven Tension
Symptom: Some stitches tight, others loose; fabric ripples or curls.
Cause: Inconsistent yarn grip or hook movement.
Fix: Practice holding yarn between pinky and ring finger for steady feed. Do 10 minutes of “tension drills”—chain 20, sc back, repeat—focusing only on smooth motion.
2. Adding or Losing Stitches
Symptom: Edges slant or project widens/narrows unexpectedly.
Cause: Missing the last stitch (often hidden under the turning chain) or working into the turning chain itself.
Fix: Always count stitches every few rows. Use a stitch marker in the first and last stitch of each row.
3. Twisted Foundation Chain
Symptom: Working in the round starts with a twist, causing a Möbius effect.
Fix: Before joining, lay your chain flat and ensure it’s not twisted. Join with a slip stitch to the first chain.
4. Splitting Yarn
Symptom: Hook catches individual plies instead of the whole strand, creating holes.
Cause: Dull hook or pushing too hard into the stitch.
Fix: Use a sharp-tipped hook (aluminum is best). Insert hook under both loops of the stitch, not through them.
5. Ignoring Gauge
Symptom: Finished item is too big or small.
Cause: Assuming all worsted yarns = same size.
Fix: Always make a 4×4 inch swatch before starting garments. Adjust hook size up or down until you match the pattern’s gauge.
From working with multiple crochet brands, I’ve found that 90% of beginner frustration stems from these five issues. Address them early, and your confidence will soar.
Advanced Tips and Professional Insights
Once you’ve mastered the basics, these pro-level strategies elevate your work from “homemade” to “handcrafted.”
Hook Material Matters More Than You Think
Aluminum is standard, but bamboo hooks provide more grip for slippery yarns like silk or bamboo. Steel hooks (sizes 0.6–3.5 mm) are essential for thread crochet (doilies, lace edgings). Experienced designers often keep 3–4 hook types on hand for different projects.
Master the Invisible Join
For seamless rounds (like hats or amigurumi), skip the slip stitch join. Instead, use the “invisible join”: cut yarn, thread through last loop, then insert needle into top of first stitch of the round and pull tight. It creates a flawless circle.
Control Your Yarn Cake
Wind skeins into center-pull balls to prevent rolling. Use a yarn bowl or DIY solution (a mug with a notch cut in the rim) to maintain consistent tension and reduce tangles.
Read Patterns Like a Pro
Patterns use abbreviations (sc, hdc, dc) and symbols (*, [], ()). Always read the entire pattern before starting. Note special stitches explained at the end. In many crochet businesses, designers include video links for tricky sections—don’t hesitate to seek those out.
Swatching Isn’t Optional for Garments
Your dishcloth doesn’t need gauge, but a sweater does. Swatch in the actual stitch pattern (not just sc), wash and block it, then measure. Skipping this step risks wasting $30+ on yarn for an unwearable piece.
Finally, embrace imperfection. Handmade means human. Slight variations add character—perfection is for machines.
Real-World or Hypothetical Examples
Let me share a story that illustrates the power of starting simple.
Sarah, a graphic designer from Ohio, picked up crochet during lockdown. She followed a beginner’s guide to crochet nearly identical to this one—starting with a dishcloth. After three tries, her edges were straight, her tension even. She moved to a striped scarf, then a baby blanket for her niece.
Encouraged by friends’ requests, she opened an Etsy shop selling custom blankets. Within a year, she was earning $800/month part-time. Her secret? She documented her learning journey on Instagram—posting “before” (messy first swatch) and “after” (finished blanket) photos. This authenticity built trust.
Today, Sarah offers a “Beginner Blanket Kit” including yarn, hook, printed guide, and QR code to her tutorial video. It’s her bestseller—not because it’s fancy, but because it removes all guesswork for new crocheters.
This mirrors what I’ve seen across dozens of micro-businesses: success begins with clarity, compassion, and a commitment to the beginner experience. Your first dishcloth might just be the seed of something much bigger.
Customization and Adaptation Ideas
Once you’re comfortable with basic stitches, personalize your projects to reflect your style.
Color Play
- Stripes: Change yarn every few rows. Carry unused yarn up the side to avoid weaving in dozens of ends.
- Ombre Effect: Use a gradient yarn cake or transition between similar shades (light blue → navy).
- Speckled Yarn: Adds subtle interest without complicating stitches.
Texture Variations
- Replace every 5th sc with a front post double crochet (fpdc) for ribbing.
- Alternate rows of sc and bobble stitch for playful texture.
- Use puff stitches in corners for decorative accents.
Shape Modifications
- Rectangle → Triangle: Increase 1 stitch at the beginning and end of every other row.
- Square → Circle: Start with a magic ring, then increase evenly (e.g., 6 sc in round 1, 12 in round 2, etc.).
- Add Fringe: Cut 8-inch strands, fold in half, and pull loop through edge stitch. Thread tails through loop and tighten.
Experienced designers often recommend keeping a “swatch journal”—a notebook where you test new stitch combinations, color pairings, and modifications. This becomes an invaluable reference for future projects or product development.
Care, Maintenance, or Best Practices
Proper care extends the life of your handmade items and tools.
Yarn Storage
- Store in breathable cotton bags (not plastic) to prevent mildew.
- Keep away from direct sunlight to avoid fading.
- Use cedar blocks or lavender sachets to deter moths (especially for wool).
Hook Maintenance
- Wipe aluminum hooks with a dry cloth after use.
- For sticky residue (from hand oils), clean with mild soap and water; dry immediately.
- Store in a case to prevent bending or dulling tips.
Project Care
- Acrylic: Machine wash cold, tumble dry low.
- Cotton: Machine wash warm, lay flat to dry (prevents stretching).
- Wool: Hand wash in cool water with wool wash, lay flat on towel to dry.
- Always check yarn labels—when in doubt, hand wash.
Blocking is essential for lace or garment pieces. Wet-block by soaking, gently squeezing water out, pinning to shape on a foam mat, and air-drying. This evens stitches and opens lace patterns beautifully.
Monetization Opportunities
While this guide focuses on learning, it’s worth noting how these skills can evolve into income streams—ethically and sustainably.
1. Sell Finished Goods
Start small: dishcloths, coasters, or simple beanies on Etsy or at local markets. Price fairly using the formula: (Materials + Labor + Overhead) × 2.
2. Create Digital Patterns
Once you’ve designed a few original pieces, write clear, tested patterns. Include photos, stitch explanations, and sizing charts. Sell on Ravelry, Etsy, or your own website.
3. Offer Classes
Teach in-person workshops at yarn shops or online via Zoom. Record evergreen courses for platforms like Teachable.
4. Curated Kits
Bundle yarn, hooks, and printed instructions for specific projects (e.g., “First Scarf Kit”). This solves the “what do I buy?” problem for beginners.
5. Affiliate Marketing
Recommend tools you genuinely use (like specific hooks or yarn brands) and earn commission on sales through affiliate links—transparently disclosed.
Crucially, monetization should follow mastery. Rushing to sell before you’re ready damages trust. Build credibility first through free, high-quality content—like this beginner’s guide to crochet—and opportunities will follow organically.
Frequently Asked Questions (FAQ)
What is the easiest thing to crochet for a beginner?
The simplest beginner project is a dishcloth or washcloth made entirely in single crochet. It uses only one stitch, builds tension control, and results in a functional item. A basic scarf (worked lengthwise in rows) is another excellent choice.
What size crochet hook is best for beginners?
A size H/8 (5.0 mm) aluminum hook is ideal for beginners. It pairs perfectly with worsted-weight yarn, providing clear stitch definition without being too large or small. Ergonomic hooks with soft grips can also help reduce hand fatigue.
How long does it take to learn crochet?
Most beginners grasp the basics—slip knot, chain, single crochet—in 1–2 hours of focused practice. Achieving consistent tension and completing simple projects typically takes 1–2 weeks of regular stitching (15–30 minutes daily). Mastery develops over months, not days.
Is crochet easier than knitting?
Many find crochet easier to learn because it uses only one hook (vs. two needles), stitches are less likely to unravel accidentally, and projects often work up faster. However, personal preference plays a role—some enjoy knitting’s rhythm more. Try both!
Why does my crochet curl or ripple?
Curling usually means your stitches are too tight; rippling suggests they’re too loose. Inconsistent tension is common for beginners. Practice with a larger hook or looser grip. Always check your gauge with a swatch before starting garments.
Can I teach myself to crochet?
Absolutely! Thousands learn successfully through books, YouTube tutorials, and blogs like this beginner’s guide to crochet. Key tips: start with simple projects, watch videos in real-time while practicing, and don’t fear mistakes—they’re part of the process.
Conclusion
Embarking on your crochet journey is a decision you won’t regret. With just a hook, some yarn, and the willingness to learn, you’ve unlocked a world of creativity, relaxation, and potential. This beginner’s guide to crochet has equipped you with everything you need to start confidently: the right tools, foundational stitches, common pitfalls to avoid, and even a glimpse into how these skills can blossom into something more.
Remember, every expert was once a beginner staring at a tangled ball of yarn, wondering how to begin. Be patient with yourself. Celebrate small victories—a straight edge, a correctly counted row, a finished dishcloth. These moments build the muscle memory and confidence that lead to beautiful, complex creations.
As you continue practicing, keep this guide handy. Return to it when you need a refresher or encouragement. And most importantly, enjoy the rhythm of the hook, the feel of the yarn, and the quiet satisfaction of making something with your own hands. Your first stitch is just the beginning—happy crocheting!

Emily Parker is a passionate crochet artist and creative storyteller. With years of experience turning simple yarn into beautiful, unique pieces, she loves sharing tips, tutorials, and inspiration with fellow crafters. Emily believes that crochet is more than a hobby it’s a way to express creativity, spread joy, and connect with people through handmade art.


